|
How a picture comes out
|
|
An astronomical picture does not ever come out by chance, in my experience. When I make pictures of a relatively easy object as the one in subject or even more difficult ones, almost at the edge of my setup, skills and local skies, I always try to understand what I'm shooting at and what I should do to obtain the planned result. I will skip the usual list of photographic techniques, as well as the reasons for taking darks, flats etc, I will instead focus into some particular aspects of the preparation and into the eventual elaboration, trying to explain more the reasons of my choices, rather than the methodologies I applied. What you really need to understand is what you do and why you do that way. The application of methods will in fact improve with time. Let's go! 1) CHOOSING THE SUBJECT: Obviously, the choice of the subject is based on our personal preferences (I really love nebulas, for example, while I don’t like galaxies), on the period of the year (you can't shoot at M42 in June), on setup owned (for example it's pointless to shoot at Stephan's Quintet with a refractor having a focal length of 300 mm). The subject of this article is the nebular complex in Auriga, IC 405 e IC 410 shot with a modified Canon 40D. The selected optic was an apochromatic Takahashi FS60C with field flattener, having a 60 mm aperture and a 375 mm focal length. The resulting field was thus about 200' x 140'. A perfect field for the picture I wanted to make. 2) ANALYSIS OF THE SUBJECT: This step is a little more complex. The best thing to do is to search on the web some photos and info on the choised subject. In my case, I knew enough about the subjects, located on one of the arms of the Milky Way, in an intense stellar formation zone, with very young stars, nebulosity emitting in Halpha, Hbeta and OIII, with a sky background packed with active hydrogen regions. The goal in this photo, rather than the shooting, was to obtain the detaching the faintest conglomerates from the sky background and giving a tridimensionality to the imaged nebulas, particularly IC 405. In order to obtain that, a good signal/noise ratio was fundamental. And, to achieve it with a modified dslr and a hardly perfect sky, a great integration was required, with subframes long enough to allow faintest zone to pass the noise level. This led to split the shots in more nights and more lunations. 3) THE SHOTS: There is little to be said in this case. Methodologies for taking pictures are the very basis of every astroimager. Personally, I use to have a great cure of the focusing through a self made Bathinov mask. Taking advantage of the camera's live view and EOS Utility program, setting exposure time to 30" and ISO to 1600 (don’t forget to set back again these values to initial desired settings), I spot a very bright star near the subject of the shots, Capella in this case, then I start focusing. It’s very important, also, to try to have always the same field of view if there are many sessions of shooting or after the meridian flip. My procedure, to have always the same field in the frame, is: - a fast stacking of the first images - stretching of the image (to enhance “dynamics”) - saving in jpg without cropping but reducing to 1200 pixels the long side Before starting the actuals shots, I perform some tests of a few tens of seconds just to check the position of the brightest stars and I iterate until they overlap more or less on the same position. I also suggest to use the dithering (move the frame of the images just a few pixels, between subsequent shots) to decrease the noise effect. |
|
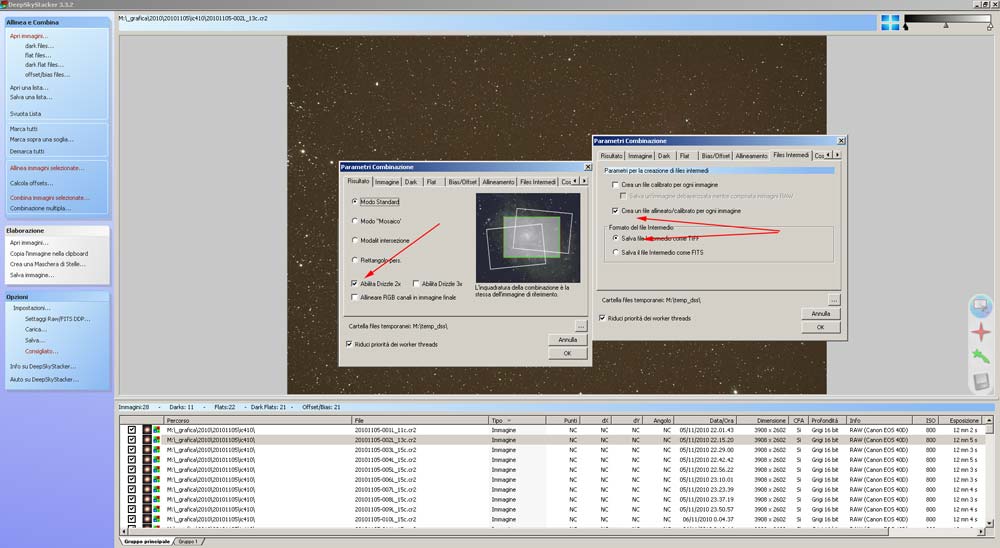
4) CALIBRATION AND STACKING: First of all I checked with exiftools software the sensor temperature of my camera, for every shot. Such software allows to read EFIX data from a file and, as the Canon uses DIGIC III electronics, it records data concerning camera temperature. These values are particularly useful for creating dark libraries, as I did during rainy days. Thus I calibrated the pictures using the free software Deep Sky Stacker. I performed a distinct calibration for both the series of pictures, using darks at the same temperature coming from my libraries, and flats, dark flats and bias taken the same nights of the photo sessions. I didn't stack calibrated images, I instead saved them in tiff format, setting the Drizzle 2x function on Deep Sky stacker. Later we'll see the reasons for this choice. |
 |
|
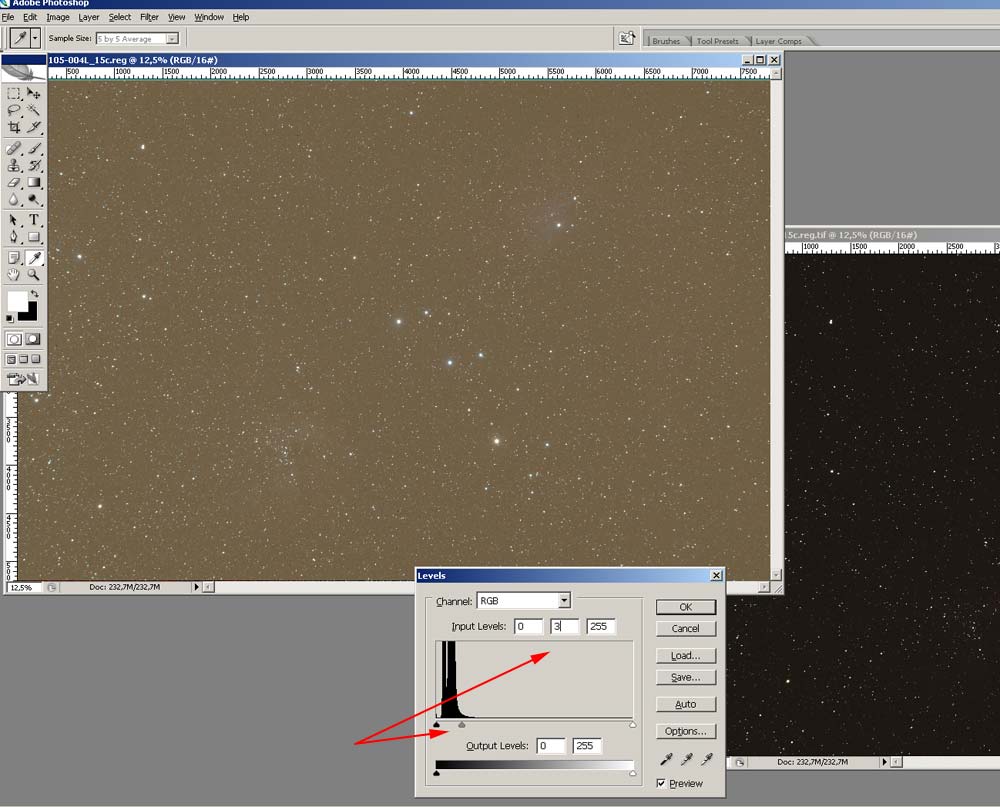
All images will appear very dark because of .tiff format has
16bit deep while Canon shoots deep is at 12bit and DeepSkyStacker doesn’t stretch
automatically images. I opened with Photoshop image by image and I used the level function in order to modify the gamma value, from 1 to 3, saving then these resulting files. |
 |
|
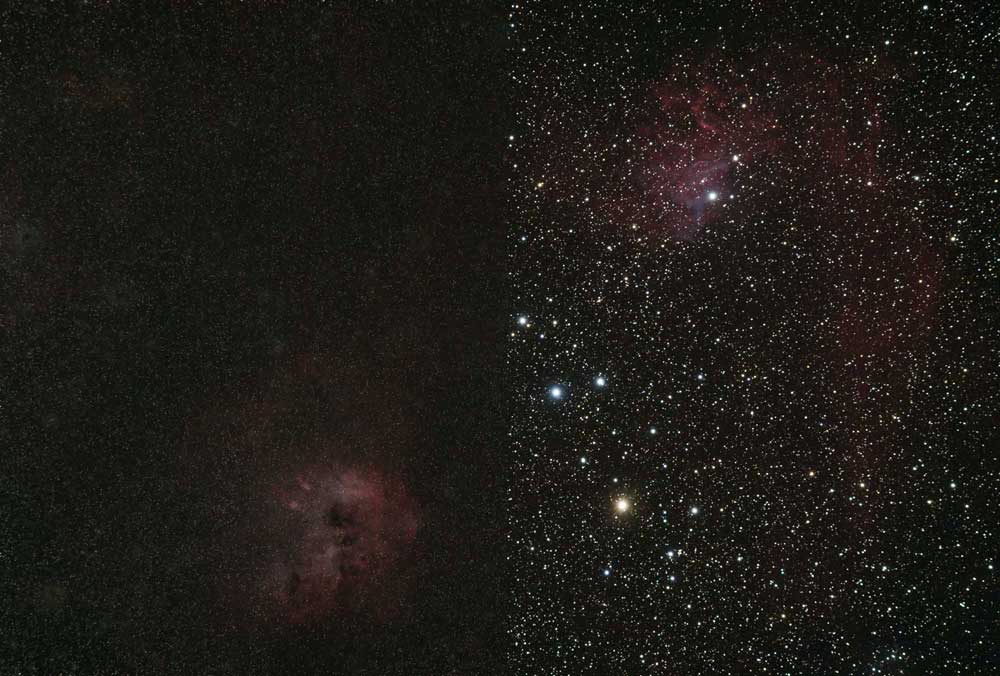
It was a total of 38 images, 40 MPixels with 16 bit depth. I used, for aligning and stacking, the Registar software, by Auriga Imaging. It's a bit out of date but it uses great aligning algorithms, in my opinion. Because of huge dimension of every image I could not align all of them in a single shoot, so I need to align a series of 6-7 pics at time. For every series of images I’ve created an average, a median and a mix of them (called median/mean). So I obtained a new series of files (called ave##, med## and mea##) and I aligned them obtaining "sum" files by first stack criterion. To explain better, If I created four groups I will obtain the resulting files ave1.tif, ave2.tif, ave3.tif, ave4.tif. I align these files and use average for the final stack. I save as average. Same for med# e mea# The three final files will thus be average.tif, median.tif e mean.tif. I open them with Photoshop and I stacked them in multiple layers. The first will be used as background, the second will have an opacity set to 50% while the third was set at 33%. I unify the three levels and save the file, which will be the final file where the elaboration will start from. As the camera is modified, being substituted the IR CUT filter, the image will be chromatically unbalanced. Using the level management in Photoshop (on the menu image – adjustments - levels), I set for each colour the gray and the black point, starting with central cursor near the end of the gaussian on the histogram, while I move the left cursor near the beginning of the curve. In this way I have a first colour calibration. I save the image with a new name. This will be the base image for the complete processing. |
|
5)
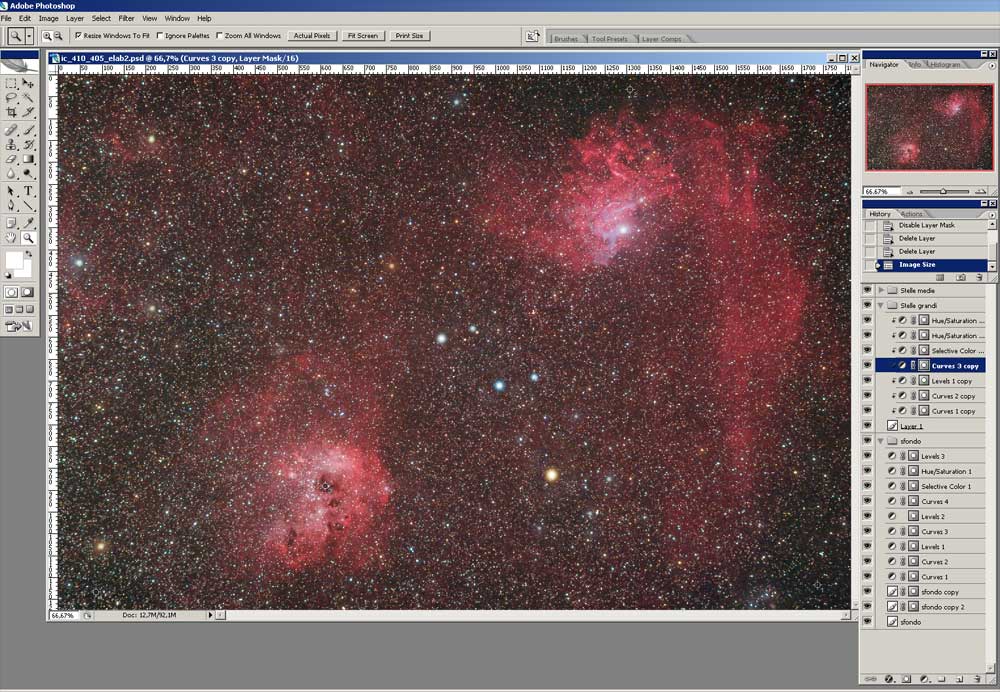
HOW TO PROCESS SEPARATELY STARS FROM NEBULA: I made a first copy of the base image and then, following the method explained by Gianni Benintende in these tutorials, I created four selections. The first for bigger stars, the second for mid size stars, the third for mid/small stars and the fourth for smaller ones. I saved them in the calibration image and in a second backup copy (which I named ic410_neb.tif). I opened the image ic410_neb.tif then I opened the selections. Then, with the "clone stamp tool" I start to erase the various stars from the photo. This is the reason why I used the drizzle during calibration (with the corresponding problems of handling huge files). I can easily work with high magnification without degradation of the image, therefore I can erase stars more precisely, minimizing as much as possible artifacts. It's a long and tedious operation, consuming many hours. Sometime my eyes hurts after an hour and I have to take a break. As a result, I will obtain the image of the nebula alone, with the background sky and faint stars (not erased, because they are too small). In the case the nebula was too dark, as it was in this one, it's possible to use adjustments layer in Photoshop, by opening the curve adjustment and then modifying properly the values. A the end of the operation of star removing, we can erase these adjustments layers. Now the final part of the elaboration begins. |
 |
|
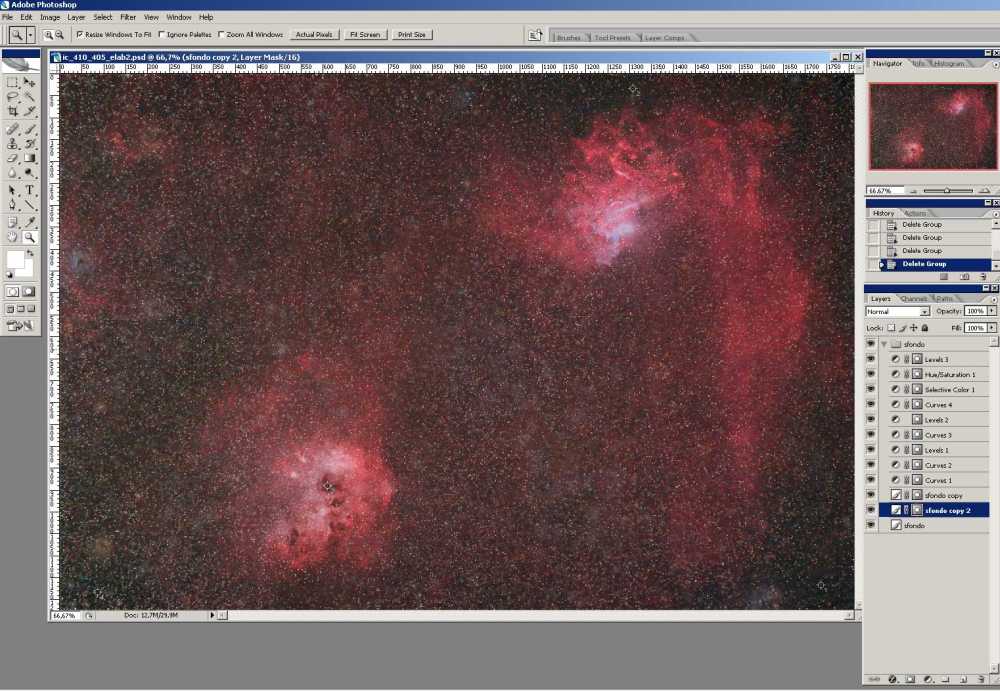
6) PROCESSING OF THE NEBULA: The most boring work has gone. Now it's time for the more rewarding and precision demanding part. Image processing has many different point of views, Personally, I try to obtain a nice looking picture. With respect to a possible scientific use, raw files are always available, though I have neither the time nor the will to start, currently, a scientific research, so the elaboration will only pursuit aesthetic purposes, satisfying my taste and my personal "viewing" of the sky. Having my basis on astronomical photography with film, I don't like aggressive processing, with very vivid colours and exaggerated blacks. My purpose will be therefore a smooth progression from the background sky to the nebulas, preserving the chromatic range and, as long as possible, without an excessive saturation. All of the elaboration tasks have been performed with Photoshop but it's possible to use similar products, too. I will use Photoshop as a reference. I open a copy of the image containing the nebula only. First of all I open the level window and I click with the right button of my mouse on the background. I select the level from the background, creating a level I can modify. Then I create a new group and I associate it with the image of the background sky and nebulas. Don't worry if the picture appears very dark. I create a new curves correction level and (by a right click) I select a creation of a layer mask. Now I open the mask “curves” and I point with the mouse about at half the straight line, curving it slightly up. The picture gets lighter. It's better not to overdo for the moment. This step must not be forced, we can iterate the process of mask creation and image brightening. So far so good. Using adjustments masks we can modify the situation without compromising the various steps. Third step. This time we open the levels mask. We gently move the black cursor (regulating low levels of light) until the background sky is a bit darker. The sky should NEVER get black. No problem if colours appears too weak, you can correct them with a new layer mask (selective colour) setting absolute mode (on the bottom of new window) and modifying colour settings. As in the previous step it's important to procede by little steps iterating the mask creation and little settings modification to reach a good result. It may be useful to create a saturation layer mask, also. These masks allow an accurate management of the images, so it's very important to know very well how to work on them. But now, if we zoom in our image we can note the noise starting to come out more and more. A low-pass filter can be a solution but, even with a good use, it looses some details on the main nebulas which are indeed very fragmented. Solution is “protection masks”. After using low-pass filter (or anti-noise filter, I use Noise Ninja but it is just one of them) I triplicate background image. I select the upper one and with the Lasso tool (setting a feather value no less than 30 pixel) I select the first nebula. Then in the bottom of layers window, I press add mask. Any change on this image will only affect the selected mask. I repeat the same procedure for the level below by selecting the second nebula and then pressing add mask. At this point, starting from down, I’ll have the first layer for the background, the second with one nebula and its protection mask, the third one with the second nebula and its protection mask, and the next layers concerning curves, colour management, saturation etc. Now I select second layer and I select (in filters menu) a blur mask. I modified parameters till I reach good contrast without noise. I repeat the procedure for the upper layer, where the second nebula is. Now the background and the nebulas are ready. We just miss the stars, but it's not a problem to have them back. |
 |
|
7) JOINING THE STARS: Processing is almost at the end. Last step is to insert stars in the image. Now we can save nebula image (named, i.e., ic410_elab1.psd) and we load calibration original image, we must copy it a first time in nebula image. In nebula image we, also, must open four groups: “great”, “medium”, “litlle”, “very little” to receive stars. We must, now, open first selection in calibration image and we must load “big stars” selection, then we paste it in “big stars group” of nebula image. We can move stars if they aren't perfectly coincident with reference image. Blending option must be “lighten”. This step must be repeated for all four stars group. Stars appears little and weak, but it's not a problem. We must copy correction layers previously created for background and paste them in “big stars” group. Don't worry if the whole image changes colour and brightness all of a sudden. We go on each adjustment layers and by selecting again the protection mask, we apply it to the reference image (the one with big stars, in this example). Same procedure for mid-size, small and smallest stars. If we feel stars too aggressive or saturated, we open the corresponding correction layers and we modify them until we are satisfied with them. |
 |
|
8)
THE LAST STEP We really are at the end. It was an hard work but now it's over. We make a final backup save file (possibly with a yet different name) and we merge all the layers. Now we can resize our image as we see fit, we save it and we are ready to share it. |
| FINAL CONSIDERATIONS |
|
I exposed how I succeeded in obtaining an image but I tried to explain a methodology
for this work. It is not mathematical formula but it is a guide, an example to help anyone to find a personal methodology for the work and to be satisfied with it as, sometimes, I am. I will be very proud if just one people will find his own “imaging way” by reading this article. |
|
A thanks to everyone will be so patient to read all my words. A special thank to Fabio Sirocchi e Antonio Adrigat in translating this article. |
|
© december 2010 - Renzo Del Rosso |
| .Link to a pdf file |
|
Did you find this article useful? Help me to keep online the web-site A web-site has some costs, both in time consuming as well as in hosting and domain maintenance. If you wish, you can give a donation of any amount. |